
Plaster Cloth Backdrop "Tutorial"
Posted by Matt Ragan | Posted in Terrain , Tips , Tournament
I didn't take anywhere near as many photos as I should have of my backdrop as I was working on it.
Foundation
However I did take a couple at the early stages. It starts with a 2 foot x 1 foot piece of foamcore. Nothing fancy, just a rectangle. I could have used plywood or MDF or anything else, I had foamcore on hand which is why I used it.
Gate
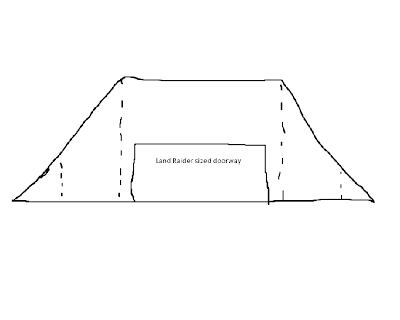
The "fortress gate" was created by measuring out a rectangle big enough for a land raider plus a bit of extra space, then adding two triangles which I then score the backside and folded in. A shape basically like this:
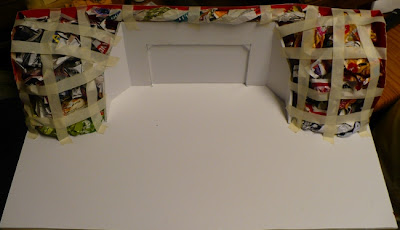
Then I taped the gate to the foundation, no glue, no pins, nothing fancy, just packing tape. I folded the triangular "wings" to form a 45 and 90 degree panel.
Backdrop
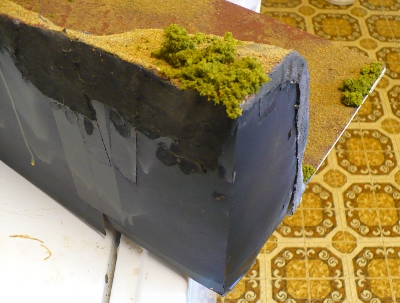
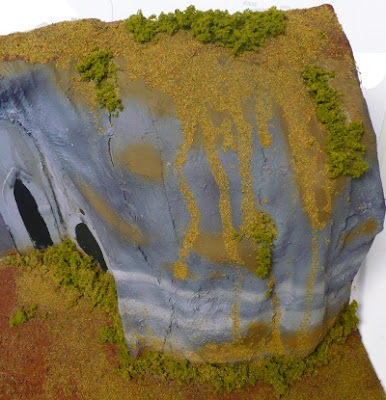
The backdrop is pretty simple to figure out from the "after" picture below. I just made a backdrop of some posterboard all across the back and up the sides up equal to where the forward leading edge of the "wings." I had some junk red posterboard lying around. It's black here because this is after the primer step.
Crumpled up Paper and Masking Tape
Then I used wads of crumpled up newsprint and masking tape to make a kind of netting of "filled" tape (or rather say fluffed, inflated with, puffed, etc.). It's as simple as 1) crumple up a sheet, 2) stick the wad on the terrain, 3) stack it higher, 4) if it gets unstable use a piece of tape to hold it temporarily, 5) when you're done make a "net" of masking tape over the entire paperwad "mountain" (you can see some of the red posterboard backdrop at the edges of the tape).
When I was done with my lattice-work, I clipped the corners of the posterboard on the sides to round them off.
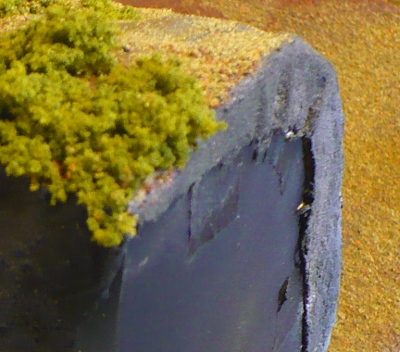
Plaster Cloth
So you can go buy plaster cloth at the hobby store or you just make it. How?
ps - You dip each strip as you use it, don't dip them all at once. :)
Apply Plaster Cloth
Starting at the outside edge, just drape the plaster cloth down and shove it around a bit until it's lying on the paperwad/tape network. Then put down the next piece of plaster cloth slightly overlapping the previous one. Continue until you're finished and all your paperwads are covered.

Let it dry
Go away and come back the next day. :)
Primer
No picture.
Primer the whole thing whatever color you want. I used black spray paint. Then go away and let it dry. It'll probably take a while. You could use brown spraypaint on the ground and gray spraypaint on the rocks and skip the Basic Airbrush step below.
Basic Airbrush
No picture.
I just airbrushed the "rocks" and "gate" gray and the "ground" brown. Then I did a few horizontal lines to represent layers in the rock formation. If you don't have an airbrush this can be done with a regular brush just as easily, just not as quickly.
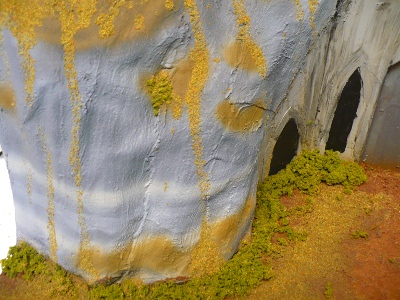
Spot Airbrush
I did gray first because I wanted to spray brown to represent windblown dirt etc. etc. in various places on the rocks above. Basically anyplace on the rocks that had a surface that looked somewhat horizontal I sprayed some brown on it.
 0
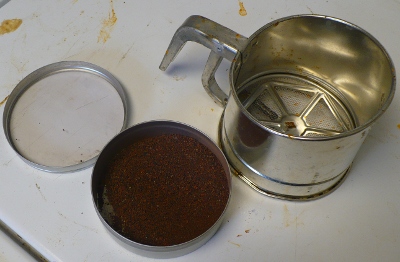
0Dirt
I went into my backyard and got some lava sand from my backyard garden supplied, used a flour sifter and sifted out the big chunks. The smaller stuff that fell through the sifter I kept in a big jar. Just plain dirt or sand works fine too so long as you let it dry before you use it. The "sifter" is what separates the big pieces out that don't look "to scale" with the 40k figures. You don't need a flour sifter, any kitchen strainer will do fine (just wash it before you use it again for food obviously).
Dirt Flock
I used my finger and spread a whole layer of basic crafter's Wood Glue down on the "ground" and then dumped the lava sand on it. Then I just kinda tipped the whole thing on its side and dumped off the excess lava sand back into a bucket to be reclaimed for later.
Wash and dry your finger/hands before the next step ...
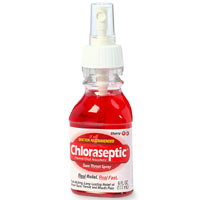
White Glue "sprayer"
You can guy a terrain sprayer at the hobby store or just use an old spritzer bottle. I had some old 2 year old Chloraseptic (a year past the date on the bottle) and I just dumped it out and used the bottle.
Spray White Glue
I mixed some white glue (Elmer's Glue or PVA glue) and water (roughly 50/50, I just eyeballed it) and put it in the sprayer bottle.
Then I sprayed the "ground" in various places where I wanted "grass" (the white glue will make your stream more like a jet rather than a mist, so just be aware). Don't be afraid of splatter... random splatter is your friend actually.
I also sprayed all the horizontal surfaces of the rocks and let a little bit dribble down. See the "bushes" step below for a picture.
Flock
Then I dumped a bunch of flock on all the glue, patted it down gently with my hand to make sure the flock was solidly shoved into the glue, then tipped the terrain over to dump off and recover the excess flock.
As you can see, random splatter picks up flock and adds to the random/organic feel.
Bushes
I dribbled the wood glue (direct from the bottle and undiluted) into all the corners where the stone backdrop and the ground met, and in random areas on the stone where there were cracks or horizontal surfaces where seeds might collect. Then I sprinkled some Woodland Scenics Clump-Foliage on it, shoved it down with my finger. Then I dumped the excess off to recover it.
Let it Dry and Blow Off The Excess
The ground, flock, bushes, etc. will take many hours to dry. Also when it's dry a bit more will come off so you'll want to tip it over when it's try and dump/blow off (with your mouth) the excess... otherwise it'll come off on your bases or all over the floor of the event/store/tournament.
I'm not really happy with the gate area so I'm not going to cover it.
Spray it With Dull-Cote
Locks down the flock and dirt a bit better.


Nice and simple, and yet it looks great! Adding a back drop to the army really helps it stand out and fell like a diorama rather than a large movement tray.
An alternative to the cloth and paster of Paris is news paper and Elmers glue. It is a bit more brittle, but much cheaper if you don't have cloth/plaster around.
Thanks! Good thought D'nyarak. I really am enamored of the Plaster, and since it's so cheap for almost a lifetime supply (I paid $6 here locally for over 4 pounds of DAP) it's a great investment (as it winds up over time being cheaper than the glue ounce-per-ounce). However, I'll try to do another backdrop with newspaper for the next one so folks can see the difference in the "rock" texture. The great thing about the cloth is that it bulges and slumps wonderfully once saturated with plaster giving you a great rocklike surface - newsprint/paper makes a great "smooth" surface like for a building or alien rock formations.